What is a Rube Goldberg Machine?
The goal of a Rube Goldberg Machine is to perform a simple task in the most complicated way possible.
The goal of a Rube Goldberg Machine is to perform a simple task in the most complicated way possible.
Project Description:
In our Rube Goldberg Project, our simple task was to staple two pieces of paper together. We used a total of 5 simple machines. We used a screw, a pulley, an inclined plane, a wedge, and a lever. We also used a total of 12 steps to complete our task.
Our 12 steps were:
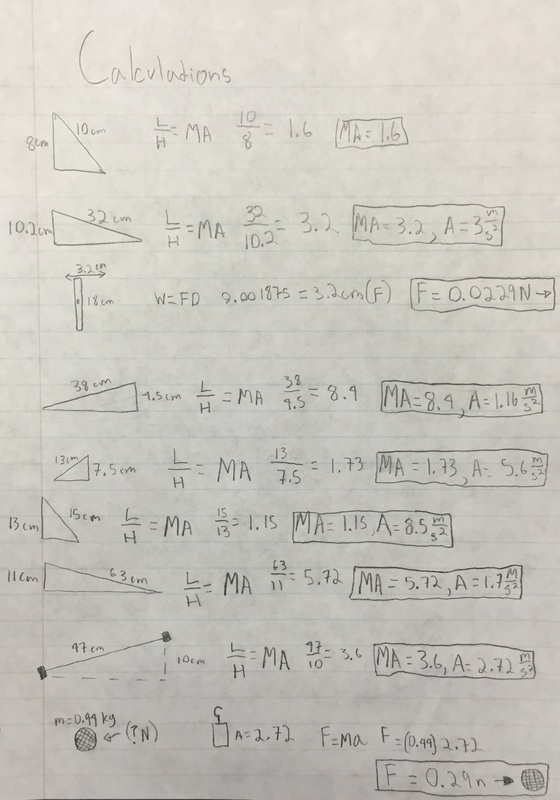
Step #1: 63 centimeter Inclined Plane, acceleration equals 3 meters per second squared.
Step #2: 18.5 centimeter Lever, applied a force of 0.0229N (N=newtons) onto the first domino.
Step #3: Dominos
Step #4: Wedge (the staple)
Step #5: 15 centimeter Inclined Plane, had a mechanical advantage of 1.15.
Step #6: 63 centimeter Inclined Plane, had an acceleration of 1.7 meters per second squared.
Step #7: Lever
Step #8: 47 centimeter Inclined Plane, had an mechanical advantage of 3.6.
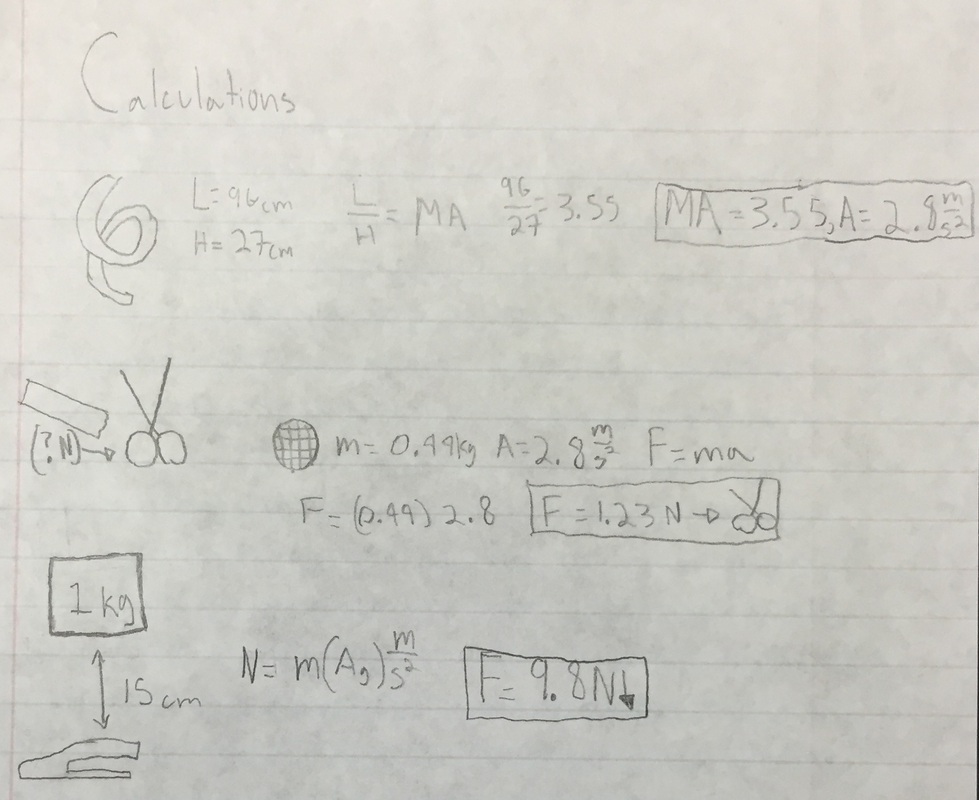
Step #9: Screw, had a mechanical advantage of 3.56
Step #10: Wedge, the golf ball applied a force of 1.23N (N=newtons)onto the wedge. (a pair of scissors)
Step #11: Pulley, had a mechanical advantage of 1.
Step #12: Stapling two pieces of paper together, the 1 kilogram mass exerted a force of 9.8N onto the stapler.
What we accomplished each day:
Day 1: We learned how to use the power-saw and the drill. We also put our first inclined plane on.
Day 2: We put rails onto the inclined plane to prevent the ball from rolling off of the track.
Day 3: We came up with a way to include and make a lever. We then figured out that we can change the ball that we were using with a lever. We then built our lever.
Day 4: We built a second inclined and put rails along the track.
Day 5: We worked on two inclined planes, put a wedge underneath of on the inclined planes so that it would maintain a stable angle. We also put a paper towel on it to absorb the impact, so that the ball wouldn't bounce off.
Day 6: We built the third inclined plane.
Day 7: We began to build the zip line.
Day 8: We made some adjustments on the zip line and finished it.
Day 9: We began to build the screw and the pulley
Day 10: We continued to work on the screw. We also added scissors as a wedge and we got 1000g weight.
Day 11: We adjusted the screw and scissors. We also added a plastic cup to assure that the ball would hit the scissors.
Problems that we encountered:
The first problem that we encountered was that the ball would continuously roll off of the inclined plane. We came up with the solution, which was to put rails along the track. The rails would prevent the ball from rolling off of the inclined plane.
The second problem that we encountered occurred while we were trying to make the lever. We need something steady, yet something that would move easily. Our simple solution was to make a larger hole in our piece of wood, and used a thin piece of metal, so that the lever would be able to move easily.
Our third problem was that the ball kept on bouncing off of the inclined plane. We decided to angle the inclined plane so that the ball wouldn't bounce off track. We made this adjustment, but the ball continued to bounce off. We then put a paper towel on the inclined plane to absorb the bounce. The paper towel worked great, along with the angled inclined plane, so that the ball wouldn't bounce off track.
In our Rube Goldberg Project, our simple task was to staple two pieces of paper together. We used a total of 5 simple machines. We used a screw, a pulley, an inclined plane, a wedge, and a lever. We also used a total of 12 steps to complete our task.
Our 12 steps were:
Step #1: 63 centimeter Inclined Plane, acceleration equals 3 meters per second squared.
Step #2: 18.5 centimeter Lever, applied a force of 0.0229N (N=newtons) onto the first domino.
Step #3: Dominos
Step #4: Wedge (the staple)
Step #5: 15 centimeter Inclined Plane, had a mechanical advantage of 1.15.
Step #6: 63 centimeter Inclined Plane, had an acceleration of 1.7 meters per second squared.
Step #7: Lever
Step #8: 47 centimeter Inclined Plane, had an mechanical advantage of 3.6.
Step #9: Screw, had a mechanical advantage of 3.56
Step #10: Wedge, the golf ball applied a force of 1.23N (N=newtons)onto the wedge. (a pair of scissors)
Step #11: Pulley, had a mechanical advantage of 1.
Step #12: Stapling two pieces of paper together, the 1 kilogram mass exerted a force of 9.8N onto the stapler.
What we accomplished each day:
Day 1: We learned how to use the power-saw and the drill. We also put our first inclined plane on.
Day 2: We put rails onto the inclined plane to prevent the ball from rolling off of the track.
Day 3: We came up with a way to include and make a lever. We then figured out that we can change the ball that we were using with a lever. We then built our lever.
Day 4: We built a second inclined and put rails along the track.
Day 5: We worked on two inclined planes, put a wedge underneath of on the inclined planes so that it would maintain a stable angle. We also put a paper towel on it to absorb the impact, so that the ball wouldn't bounce off.
Day 6: We built the third inclined plane.
Day 7: We began to build the zip line.
Day 8: We made some adjustments on the zip line and finished it.
Day 9: We began to build the screw and the pulley
Day 10: We continued to work on the screw. We also added scissors as a wedge and we got 1000g weight.
Day 11: We adjusted the screw and scissors. We also added a plastic cup to assure that the ball would hit the scissors.
Problems that we encountered:
The first problem that we encountered was that the ball would continuously roll off of the inclined plane. We came up with the solution, which was to put rails along the track. The rails would prevent the ball from rolling off of the inclined plane.
The second problem that we encountered occurred while we were trying to make the lever. We need something steady, yet something that would move easily. Our simple solution was to make a larger hole in our piece of wood, and used a thin piece of metal, so that the lever would be able to move easily.
Our third problem was that the ball kept on bouncing off of the inclined plane. We decided to angle the inclined plane so that the ball wouldn't bounce off track. We made this adjustment, but the ball continued to bounce off. We then put a paper towel on the inclined plane to absorb the bounce. The paper towel worked great, along with the angled inclined plane, so that the ball wouldn't bounce off track.
Reflection:
As you can imagine, I have learned a lot while experimenting with six different simple machines. We did experiments with simple machines such as inclined planes, levers, and pulleys. We also did an experiment with a ball drop and an eight meter ramp, where we measured the potential and kinetic energy of the ball. While I was playing around with the pulley, I learned a simple way to calculate the pulley's mechanical advantage. You have to count the ropes on the pulley and subtract the one that you are pulling on to find the pulley's mechanical advantage.
A life skill that I learned while building our Rube Goldberg Machine was how to use power tools. Not only did I learn how to use a power saw and a drill, but I also improved my communication skills. Our first presentation on Rube Goldberg Night was a little rough, but as the night continued, my group's communication skills improved. Communication skills was one of the life skills that I learned during this project. I was always told, "Practice makes perfect," when I was younger, but I truly experienced this on the Rube Goldberg Night.
During Rube Goldberg night my group was able to explain all of the steps on our machine clearly. We were able to work together to answer the audience's questions to the best of our abilities. One set back during the Rube Goldberg night was that our dominos didn't work as well as we thought they would, so to make our presentation better we took out the dominos. Since we didn't plan our time very well, and we had to rush at the end, our screw wasn't as consistent as I would have liked it to be.
Even though I was happy with our end result, I still believe that we could have done some things better. One thing that I would have liked to improve was our time management/planning skills. As a group we just went with the "flow" which wasn't the best choice, considering all of the cramming that took place in the last couple of days. The second improvement I would have made is changing the order of our steps. I regret putting the screw at the bottom of our project. I think that the screw would have been much easier to build and function if it was one of our first steps. It was very hard for us to incorporate the screw at the end. Besides theses minor changes that I would have done, I was very happy with how my group worked together and with our final product.
Concepts:
Work~ is done when a force that is applied to an object causes that object to move. You calculate the work of an object by multiplying the force exerted on the object by the distance it was moved. The unit for work is Joules.
Force~ a force can described as a push or a pull. You multiply an object's mass by its acceleration to find its force. Forces are measured in units called forces.
Actual Mechanical Advantage~ is the mechanical advantage that includes that is taking place in the "real" world. Distance divided by height gives you the mechanical advantage of a simple machine.
Ideal Mechanical Advantage~ is the mechanical advantage in a perfect situation. Ideal Mechanical Advantage does not take friction or air resistance into consideration. You calculate the ideal mechanical advantage of an object by dividing the input distance by the output distance.
Potential energy~ is determined by the position of the object
Kinetic energy~ is determined by the motion of the object. If an object is falling it has kinetic energy.
Speed~ is the rate at which something moves. You calculate speed by dividing the distance traveled by the time of travel.
Velocity~ is the rate of change of the position of an object. You calculate velocity by dividing the change in distance by the change in time.
Acceleration~the increase in the rate or speed. You can calculate the acceleration of an object by dividing its velocity by the change in time.
|
|
Final Project:
